|
Architecture
of square
Usage
instructions
Welcome
to the interactive web-art engine "Architecture of square"! The function
of this web site is to help bringing into awareness certain contents
which participate in a process of composing a work of art; as well as
to entertain the user.
Basic
question of composing is where to place what. The format in which the
disposition is done is offering some preferred locations: centre, halves,
thirds, diagonals etc. Therefore the user, by choosing one
of the basic image
(  , ,
 ...), within them chooses also certain disposition; however some parts
are animated which enables varying disposition according to free will.
Animation of a basic image is achieved in the following way: using mouse
roll cursor (arrow) over basic image. Where arrow turns into hand are
"buttons" to be governed. The Animated surface hides two invisible "buttons"
which enable two ways of animation. Mouse "click" on one of them sets
half of the surface into continuous animation to the final extreme position,
and the other half moves a little bit with every "click" of the mouse,
which enables precise control.
Next
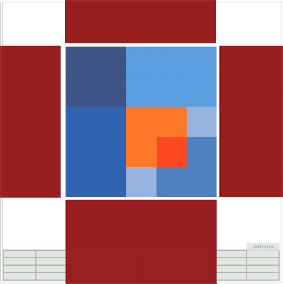
matter is composing by adding to image surfaces and their sizes,
orientations and colours. There are four surfaces hidden in places shown
in image 1; their initially set colour is red. Rolling an arrow of cursor
in place of their disposition (above, below, left and right from the
basic image) changes the arrow into a "hand". Clicking on the mouse
and dragging ("drag'n'drop") enables carrying surfaces and palcing them
in the desired place. In the upper right corner of each surface is a
button which enables colours to change. When you roll over it with the
mouse, an image of a bucket with colours appears and dissappears by
moving the cursor further. Clicking on the image changes colours in
the order of the spectrum: red, orange, yellow, green, blue, purple
and added black and white. Transparency makes them lighter.
Added
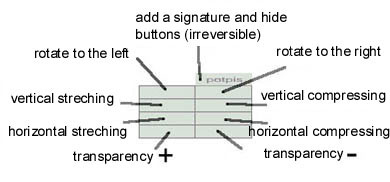
surfaces can be controled by buttons visible under the basic
image. Buttons are organized in four groups, for each surface one group:
first for left surface, second for upper, third for lower and fourth
group for the right surface. Functions of buttons are shown on image
2: rotation, stretching and transparency.
At
last, a signature can be added to the finished image by clicking
on a button "signature". This button is also at the same time hiding
all buttons (irreversibly with current "painting"!) which enables clean
printing of created and signed image.
Home
|

image
1: locations of hidden surfaces

image
2: functions of control buttons
|